Cambium routers are well-regarded for their high-performance networking capabilities, ideal for both residential and enterprise environments. To effectively manage your Cambium router, logging into the admin interface is a crucial first step. This guide will walk you through the login process and provide detailed instructions for changing your network’s SSID and password to enhance security and functionality.
Contents
Default Login Links for Cambium Routers
What Are the Default Cambium Router Login Links?
To access the admin dashboard of a Cambium router, you can use the following default IP addresses or URLs:
- Default IP Address: http://192.168.1.1 or http://192.168.0.1
- Alternative Login URL: http://cambium.network
These links allow you to connect to the router interface for configuration and troubleshooting purposes.
When to Use These Links
- Initial router setup.
- Updating the network SSID or password.
- Monitoring and troubleshooting network issues.
How to Log In to Your Cambium Router

- Connect to the Router
- Use an Ethernet cable or connect to the router’s Wi-Fi network for a stable connection.
- Open a Web Browser
- Launch any browser on your device and type the default IP address (e.g., http://192.168.1.1) into the address bar.
- Enter Login Credentials
- Default Username:
admin - Default Password:
admin(or refer to the label on your router for specific login details).
- Default Username:
- Access the Admin Dashboard
- After entering the correct credentials, click “Login” to enter the admin interface.
How to Change SSID and Password on a Cambium Router
Why Update Your SSID and Password?
Updating the SSID and password helps secure your network, prevents unauthorized access, and makes your network easily identifiable.
Steps to Change SSID and Password
- Log In to the Admin Interface
- Follow the login steps outlined above to access the router settings.
- Navigate to Wireless Settings
- In the admin dashboard, look for the Wireless or Wi-Fi Settings section.
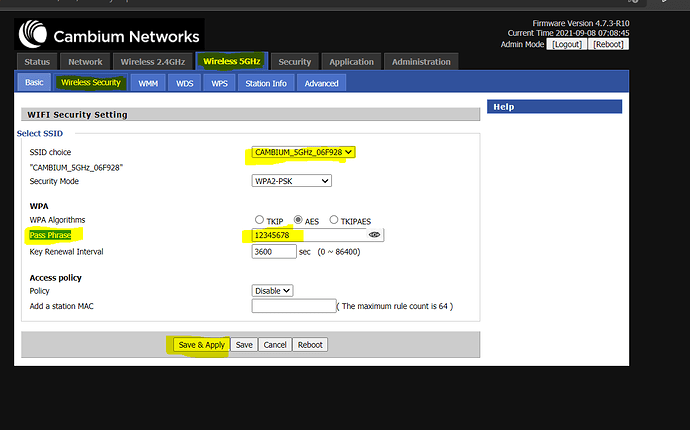
- Change the SSID
- Locate the SSID field (network name) and enter a new, unique name that reflects your preference.
- Update the Password
- Find the Passphrase or Password field under the security settings.
- Select WPA2-PSK for the best security level and create a strong password combining letters, numbers, and symbols.
- Save Changes
- Click Apply or Save to confirm the updates.
- Reconnect your devices using the updated SSID and password.